Weather
|
Indicator 1: Analyze the various
structures and processes of the Earth system.
|
Bloom’s Taxonomy Level |
Standard, Supporting
Skills, and Examples |
|
(Comprehension) |
1.E.1.1. Students
are able to recognize changes in weather over time.
·
Seasonal changes
Example: Graph sunny, cloudy, rainy, windy, and stormy days. |
|
Supporting Websites
Experiments/Projects
Anemometer
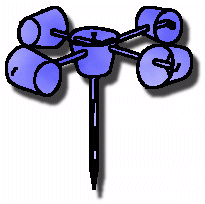
Materials
five 3 ounce paper Dixie cups
two straight plastic soda straws
a pin
scissors
paper punch
small stapler
sharp pencil with an eraser
Procedure
Take four of the Dixie cups. Using the paper punch, punch one hole in
each, about a half inch below the rim.
Take the fifth cup. Punch four equally spaced holes about a quarter
inch below the rim. Then punch a hole in the center of the bottom of the
cup.
Take one of the four cups and push a soda straw through the hole. Fold
the end of the straw, and staple it to the side of the cup across from the
hole. Repeat this procedure for another one-hole cup and the second straw.
Now slide one cup and straw assembly through two opposite holes in the
cup with four holes. Push another one-hole cup onto the end of the straw
just pushed through the four-hole cup. Bend the straw and staple it to the
one-hole cup, making certain that the cup faces in the opposite direction
from the first cup. Repeat this procedure using the other cup and straw
assembly and the remaining one-hole cup.
Align the four cups so that their open ends face in the same direction
(clockwise or counterclockwise) around the center cup. Push the straight
pin through the two straws where they intersect. Push the eraser end of
the pencil through the bottom hole in the center cup. Push the pin into
the end of the pencil eraser as far as it will go. Your anemometer is
ready to use.
Your anemometer is useful because it rotates with the wind. To
calculate the velocity at which your anemometer spins, determine the
number of revolutions per minute (RPM). Next calculate the circumference
(in feet) of the circle made by the rotating paper cups. Multiply your RPM
value by the circumference of the circle, and you will have an
approximation of the velocity of at which your anemometer spins (in feet
per minute). (Note: Other forces, including drag and friction, influence
the calculation but are being ignored for this elementary illustration.
The velocity at which your anemometer spins is not the same as wind
speed.)
The anemometer is an example of a vertical-axis wind collector. It need
not be pointed into the wind to spin. (Note: This paper cup anemometer
will produce a reasonable approximation of circumferential velocity, but
should not be used for any purpose other than elementary illustration.)
http://sln.fi.edu/tfi/units/energy/dixie.html
|
Wind Vane
Before You Start...
A weather vane is also called a wind vane. It is a tool for measuring wind
direction. It spins on a rod and points in the direction from which the wind
comes.
The weather vane is one of the oldest weather tools. The part of the vane
that turns into the wind is usually shaped like an arrow. The other end is wide
so it will catch the smallest breeze. The breeze turns the arrow until it
catches both sides of the wide end equally. The arrow always points into the
wind. The arrow tells you the direction from which the wind is coming.
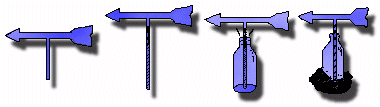
Materials
paper and pencil
scissors
cardboard
compass
plastic soft drink bottle
plastic drinking straw
shallow pan filled with rocks
felt marking pen
Procedure
What is a weather vane? When have you seen weather vanes? Write down your
answers. Draw a picture of a weather vane.
With the scissors, carefully cut an arrow with a tab from the tag board, as
shown. Remember that scissors are sharp, so handle them carefully. Bend the tab
slightly so the arrow turns easily when you put it in one end of the straw. Put
the other end of the straw in the bottle. Remove enough rocks from the pan to
make room for the bottle. Pile the rocks back around the bottle so it won't be
blown over. (See illustrations above.)
A compass always point north. Use your compass to find north, and then mark
the four sides of the bottle E, W, N, and S with a felt pen.
Set your weather vane in a high place such as the top of a playhouse or a
slide. Make sure it does not wobble or tilt, and that it catches the slightest
breeze.
Watch your weather vane closely and then describe how it works. Test it on
windy days and again when there is just a light breeze.
Background Information
A weather vane is a tool used to tell which direction the wind is coming from.
Weather vanes are usually found on top of buildings so they will catch an open
breeze. Look for them on top of barns, houses, weather stations, hardware
stores, and other places that sell or use weather tools. The part of the vane
that turns into the wind is usually shaped like an arrow. The other end is wide
so it will catch the smallest breeze. Sometimes a metal rooster or other animal
sits on top of the weather vane.
You have made a weather vane! If the wind is blowing from the south, the wind
is usually warm. If the wind is blowing from the north, the wind is usually
cooler.
Some weather vanes have directional strips underneath the arrow to make it
easier to read. Your markings on the bottle do the same thing.
The breeze turns the arrow on the weather vane until it catches both sides of
the wide equally. The arrow always points into the wind.
It is easier to see how the energy from the wind moves your weather vane if
it is up high and in an open area. You might also want to experiment by putting
it on the ground.
A weather vane is one of the oldest weather tools. It is still used today to
measure the direction of the wind. Weather vanes can only measure wind direction
a few yards (meters) off the ground. Large, helium-filled weather balloons are
used to measure winds high above the earth's surface. The balloons move with the
same speed and direction as the wind.
http://sln.fi.edu/tfi/units/energy/dixie.html
Pinwheel Wind Collector
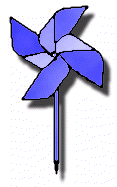
Materials
a pin
a square piece of construction paper (about 8.5" x 8.5")
a sharpened pencil with an eraser
scissors
Procedure
Lay the square of paper flat on a table and draw a line diagonally from each
corner to the opposite corner. Mark the center of the square where the two lines
cross and punch a small hole through it with the pencil tip. Next, cut along
each line stopping about an inch from the hole in the center of the square. Take
the pin and punch a hole in the top left corner of each of the four flaps. (No
two holes should be next to each other.) Pick up a flap at a punched corner and
carefully curve it over toward the center hole, securing it with the pin. Repeat
this for the other flaps. When all four flaps are held by the pin, carefully
lift the paper without letting the flaps unfurl. Lay the pencil flat on a table
and carefully push the point of the pin into the side of the eraser.
Now your pinwheel is complete and ready to go. Pick up the pinwheel near the
pencil point and let it catch the wind. Your students should discover that the
pinwheel only spins when the wind hits its center.
You now have a simple wind collector. The pinwheel is an example of a
horizontal-axis active wind collector. It must be pointed into the wind in order
to spin.
BLUE SKY EXPERIMENT
MATERIALS:
- flashlight
- 2-liter pop bottle
- milk
- water
PROCESS:
Fill the 2-liter bottle three-fourths
full of water and prop up the flashlight, so it will shine through the bottle
from the side.
Add a teaspoon of milk to the water.
Put the cap on the bottle and shake to
mix up the water and milk.
What do you see? Keep adding milk until
you start to see a blue light that is scattered to your eyes from the mixture.
Once you see the blue light, add more
milk to the mixture until you see more of an orange or red light.
EXPLANATION:
Just like in the atmosphere, the mixture
scatters more of the blue wavelength than any other color. That’s why the sky is
blue! At sunrise or at sunset, there is even more scattering taking place due to
the angle of the sun. This causes the reds and oranges to scatter into our
atmosphere. That’s why our sunsets and sunrises are so colorful!
EXAMINING COLORS

MATERIALS:
- red, blue and yellow food color
(primary colors)
- 1 cup of milk
- dish soap
- shallow and flat bowl or container
PROCESS:
Pour 1 cup of milk into the bowl.
Add 3 drops of red food color to one
edge of the bowl.
Add 3 drops of blue food color 1/3 of
the way away.
Add 3 drops of the yellow food color 1/3
of the way away.
Don't mix of jiggle the bowl.
Squeeze a drop of the dish soap in the
center of the bowl.
Watch what happens!
EXPLANATION:
The dish soap does not mix with the
milk. Instead, it floats on top and spreads over the surface. As it spreads, it
grabs the food color of the primary colors you dropped into it. Where the color
meet, the combine and form new colors. We call these colors, secondary colors!
Red + Yellow = Orange
Blue + Red = Purple
Yellow + Blue = Green
INDOOR RAINBOW
MATERIALS:
- glass jar or a large drinking glass
- small mirror
- flashlight
- dark room with white walls
PROCESS:
Fill the jar or glass with water.
Place the mirror inside the water filled
jar or glass.
Tilt the mirror slightly upward.
In a very dark room with white walls,
shine the flashlight onto the mirror.
A rainbow will appear! (Note: If no
rainbow appears at first, just change the angle of the light from the flashlight
or change the angle of the mirror.)
EXPLANATION:
The mirror reflects light that passes
back through the water, traveling at an angle. The water bends, or refracts, the
light. As the light bends, it separates into the colors of the rainbow...red,
orange, yellow, green, blue, indigo and violet.
CLOUD IN A BOTTLE

MATERIALS:
- 2-liter clear plastic pop bottle
- matches (children will need adult
assistance to light matches)
- warm water
PROCESS:
Fill the clear plastic 2-liter bottle
one-third full of warm water and place the cap on. As warm water evaporates, it
adds water vapor to the air inside the bottle. This is the first ingredient to
make a cloud.
Squeeze and release the bottle and
observe what happens. You’ll notice that nothing happens. Why? The squeeze
represents the warming that occurs in the atmosphere. The release represents the
cooling that occurs in the atmosphere. If the inside of the bottle becomes cover
with condensation or water droplets, just shake the bottle to get rid of them.
Take the cap off the bottle. Carefully
light a match and hold the match near the opening of the bottle.
Then drop the match in the bottle and
quickly put on the cap, trapping the smoke inside. Dust, smoke or other
particles in the air is the second ingredient to make a cloud.
Once again, slowly squeeze the bottle
hard and release. What happens? A cloud appears when you release and disappears
when you squeeze. The third ingredient in clouds is a drop in air pressure.
EXPLANATION:
Water vapor, water in its invisible
gaseous state, can be made to condense into the form of small cloud droplets. By
adding particles such as the smoke enhances the process of water condensation
and by squeezing the bottle causes the air pressure to drop. This creates a
cloud!
Above four experiments from:
http://www.weatherwizkids.com/optical_illusions.htm