|
Rocks
Home
Page |
|
South Dakota First Grade Standards Met:
1.E.1.2. Students are able
to describe rocks in terms of
properties.
Webb Level: 2
Bloom: Comprehension
Verbs Defined: Describe – to tell in words and/or numbers
Key Terms Defined: Properties – size and color
Teacher Speak: Students are able to describe (to tell in words and/or
numbers) rocks in terms of properties (size and color).
Student Speak: I can tell in words
and/or numbers (describe) about rocks in terms of size and color
(properties).
|
First Grade Earth/Space Science
Performance
Descriptors
|
Advanced |
First grade students performing at the advanced
level:
·
identify what can be observed in the sky by the unaided
eye in the day and at night. |
|
Proficient |
First grade students
performing at the proficient level:
·
recognize changes in weather over time;
·
describe rocks. |
|
Basic |
First grade students
performing at the basic level:
·
describe the current day’s weather;
·
identify rocks . |
|
|
Sedimentary Rocks:
|
Coal
(bituminous)
Conglomerate
Gypsum
Halite
(rock salt)
Limestone
(fine grain) |
Sandstone
Schist
(garnet)
Shale
Slate
(grey) |
|
|
Igneous
Rocks:
|
Basalt
Gabbro
Granite
Obsidian |
Porphyry
Phyolite
Pumice
(grey) |
|
|
Metamorphic Rocks:
|
Coal
(anthracite)
Gneiss
(banded)
Marble
(white)
Quartzite |
Sandstone
(red)
Schist
Shale
(grey) |
|
|
Rock Cycle Song
(Sing to the tune of
"Row, Row, Row Your Boat")
SEDIMENTARY
rock
Has been formed in layers
Often found near water sources
With fossils from decayers
Then
there's IGNEOUS rock
Here since Earth was born
Molten Lava, cooled and hardened
That's how it is formed
These two
types of rocks
Can also be transformed
With pressure, heat and chemicals
METAMORPHIC
they'll become.
|
What Is in
Dirt?
Grade Levels:
K, 1, 2, 3, 4, 5
Lesson Submitted by: Tammy Payton
Objective
Students will discover
that there are many elements to soil. Students will develop their observation
and classification skills.
Materials Needed:
magnifying glasses
toothpicks
13 by 18 inch sheet of
white construction paper for each group
Activity
Description:
Begin this session by
telling the students that soil came from eroded rocks and decaying material.
Tell your students that they will be examining soil and sorting the elements
found in soil into three categories: soil (dirt), rocks, and decaying
material. Brainstorm with your class what decaying material means until they
understand that it was once something that had been alive. Tell the students
that as they find particles of decaying material, try to figure out what it
had been before it died.
Divide the class into
teams of two to three students. Each team should have a magnifying glass,
toothpick, one piece of white construction paper, and about one cup of soil.
Be sure that the soil samples that the children will be examining contain
decaying material. You may have to enrich the soil sample by adding extra
leaves, grass clippings, and twigs to the soil mixture. Pour the soil on the
white construction paper and have the students sort and classify the material
that they find in the soil by using their toothpicks. Rich soil should contain
small amounts of water and air. By using the white piece of construction paper
for a work mat, the moisture should become evident to the students as they
examine the soil.
Once the students have had
sufficient time to categorize their soil sample, have the students return to
the large group and report their findings. Encourage the students to observe
the mats that they worked on and determine if there is anything else present
in the soil other than dirt, rocks, and decaying material. Hopefully the
students will discover on their own that water and air are present in the
soil.
To make this hands-on
activity more interesting, provide different samples of soil taken from
various areas such as from the forest floor, a garden, or the city park.
Instead of having all of the teams observing and classifying the same kind of
soil, each group can have a different sample of soil. When the groups report
back to everyone, discuss with the students which kind of soil is richer and
what characteristics make it this way.
Discuss with your group
that each year a new layer of soil is added on top of last year's layer of
soil. Every year, more and more soil accumulates, and after hundreds and
thousands of years have passed, the soil that is buried deep within the earth
will slowly begin to change into rock.
Discovering Rocks
Grade Levels:
K, 1, 2, 3, 4, 5
Lesson Submitted by: Tammy Payton
Objective
How well do you know your
rocks? This is an easy introduction for your students that will hone their
observation skills on the rocks in their neighborhood.
Materials Needed:
large butcher paper for
word web and magic markers
yarn
Activity
Description:
Have students collect
rocks for this discovery activity. Here are some suggested ideas for
collecting a variety of rocks:
-
Give each student a
paper bag or a baggie and have them investigate what rocks are close to
school. Have them choose three rocks for this hands-on activity.
-
If you don't have a
collection of rocks close to your school or are unable to collect rocks
around your school, you can tell students to bring in three rocks from
home for homework. Tell them to try to find different kinds of rocks. The
wider variety your children bring in, the better this activity will be!
-
If you really want to
get a WIDE variety of rocks, announce on a mailing list or web site that
you want to do a rock swap. See the web page on Rock Swap for ideas on how
you can collaborate with other educators.
Now that your class
 has
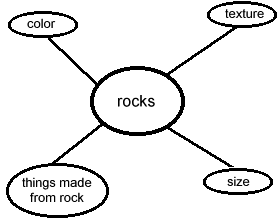
a rock collection, have your students brainstorm on what they know about
rocks. Do this by seating your students in a large circle and placing the
rocks that they have collected in the middle of the circle. Ask your students
what they already know about rocks and organize their information on a large
sheet of butcher paper by creating a word web of facts. Ask them the following
questions and record:
-
Are all of the rocks
the same colors?
Do all rocks have the
same texture?
Are all rocks the same
size?
Can you name something
in our school that is made from rock? How about something in our city?
How do you think rocks
are made?
After recording what the
students already know, explain that the earth's crust is made of rock. Explain
to the students that the earth is like a carmel covered apple. The soil is the
carmel, the skin of the apple is the crust, the fleshy part of the apple is
the mantel, and the core of the apple is the earth's core.
As soil accumulates over
the years, the older soil is pushed farther and farther down. Eventually, the
soil turns into sedimentary rocks. Sedimentary rocks keep getting pushed
further and further down. In fact, the deeper you dig into the earth, the
hotter it gets under ground. So as the sedimentary rock is pushed farther and
farther under ground, there is a lot of pressure and heat added to the rock.
Eventually, sedimentary rock will "morph" into another kind of rock called
metamorphic.
There is one other kind of
rock found on earth and it is called fire rock, which scientist say is
igneous. What do you think makes fire rocks? Deep under the earth, it is so
hot, that rocks have melted! This melted rock is called magma. Sometimes the
pressure is so tremendous under the earth, that the magma will begin to push
up through the earth's crust and a volcano is created. When enough pressure is
made in the volcano, the magma will erupt from the volcano and lava will begin
pouring out of it. As the lava cools, igneous rocks are formed. Scoria and
pumice are two rocks that are created from cooled lava.
Have the children work in
groups of two to four. Each child takes the rocks that they brought for this
activity and a length of yarn. As a group, have the children sort and classify
rocks by taking the length of yarn and creating a circle. Children will
discuss, as a group, how the rocks are similar and different and place the
rocks inside of the circle of yarn that are the same.
Help, I'm
Melting!
Grade Levels: K, 1,
2, 3, 4, 5
Lesson Submitted by: Tammy Payton
Objective
Students will have an understanding
of how erosion happens and that this is part of the rock cycle.
Materials Needed:
straws
sprinkling watering can
Activity Description:
Divide students into small groups
and allow each group to create their own mountain of sand. Let the students
add details to their creations by adding twig trees and small boulders. Once
their creations are complete, give each student a straw. Have them blow
through the straw and see what effect the "wind" has on their mountain.
Discuss how wind erodes the land in this same way.
Next use a watering can that has a sprinkling head
and have the students sprinkle the water on their mountains. Have them observe
the changes and discuss what they are. Tell the students that rain effects the
world in the same way. Discuss with the students that wind and rain erode the
earth in the same way that they have eroded their sand mountains.
Have the group discuss their observations. Tell the
students that as wind and rain erode bits of earth everyday, many of these
eroded particles are washed downstream and settle at the bottom of ponds,
lakes, and oceans. After many years have elapsed and layers and layers are
added on top of each other, the layers at the bottom will slowly begin
changing into rock because of the weight and pressure on top of them.
Metamorphic Magic!
Grade Levels: K, 1,
2, 3, 4, 5
Lesson Submitted by: Tammy Payton
Objective
Students will have an understanding
of how erosion happens and that this is part of the rock cycle.
Materials Needed:
Activity Description:
Have the students measure, stir,
and bake the
Metamorphic Cookie recipe. Explain to the students that the ingredients
they are adding represent sediments of material. As you add each ingredient to
the mixture, they are becoming compacted together. After all of the
ingredients are added, you have something similar to a sedimentary rock
formation. When you form the small, teaspoon size drops of dough on the cookie
sheet, you have compacted the ingredients together to form a solid material.
You can discuss how this is similar
to conglomerate rock. Conglomerate rocks are sedimentary rocks. They are made
up of large sediments like sand and pebbles. The sediment is so large that
pressure alone cannot hold the rock together, but are cemented together with
dissolved minerals. The chips and nuts can represent the large sediments and
the dough represents the dissolved minerals that cement the rock.
Next have the students predict what
will happen to this dough when heat is added to this mixture. Tell the
students that this is how sedimentary rock is changed, or morphed, into
another kind of rock. Metamorphic rocks were once igneous or sedimentary. The
rocks are under tons and tons of pressure, which fosters heat build up, and
causes them to change. Although we are not adding pressure to the cookies, we
are emulating the heat that causes the rocks to change with the oven.
Once the cookies are out of the
oven, let the students mine for minerals. Give each student one cookie on a
paper plate and a toothpick. Have students compare the size of their cookies
with other students, then weigh the cookies to see if they all weigh the same.
Query your students why they think all of the rocks/cookies do not weigh the
same. Some cookies will weigh less than others, because some may have fewer
"minerals" in their rock.
Next have the children mine for
minerals by taking their toothpicks and excavating their rock. Have them sort
the minerals they have and discuss whether or not the minerals changed their
appearance since the heat was applied.
Have the students compare the
number of minerals found in their rock to the rocks of the other students
.
Let's Dig
Deeper!
Grade Levels: k, 1,
2, 3, 4, 5, 6, 7, 8
Lesson Submitted by: Tammy Payton
Objective
Students will practice their
researching and evaluating information skills, electronic communication
skills, and sharing their findings by creating a presentation about the facts
they found.
Materials Needed:
- Internet access using a web browser such as
Netscape or Internet Explorer
e-mail access
poster board and markers to make a visual
presentation for their topic
Activity Description:
After the students have done some
introductory lessons on what are rocks and how they are formed, have the
students brainstorm what facts they want to know in addition to what they have
already learned. Depending on the age of the students this can be done as a
whole group with primary students, in small groups with intermediate age
students, or by individuals with secondary age students.
Suggestions for facts that they may
want to explore in depth could include researching a particular kind of rock
to discover how it was formed and the uses man has for it or understanding how
sandstone and other sedimentary rock can be found at the top of mountains.
Once the students have listed additional facts that they want to learn, narrow
this topic to a specific area.
Older students can work
independently while younger students may work in small groups or in a whole
group with teacher direction. Next have your students use the web site called
Digging for
Information and search for information using the
Yahooligans or
Ask Jeeves search engine.
If students cannot find the answers
to their questions after they have searched extensively, have the students ask
a geology expert by visiting the web page sponsored by the
United States
Geological Survey. Inform the students about the limitations to the
questions that they can ask the geology expert. These limitations are listed
at the bottom of the page that hosts the web page for "Ask
the Geology Expert."
Students need to document where
they found the information by recording where it came from. Encourage the
students to find at least three informational sources for the answers to their
question. Have them evaluate the information that they found to see if there
is anything contradictory in the information between their three sources.
Have the students share the
information that they found with their group. Students can either create
projects made by the entire group, small groups, or individually.
Making Fossils
|
Suggested Grades
|
K+ |
Objective
|
Students will better understand how fossils are created by making their
own. |
Materials
|
- plaster of paris
- paper plates
- objects to make impressions of (leaves, shells, twigs, grass, flowers,
etc.)
- paint (optional)
|
Method
|
- Explain to students about fossilization.
Fossilization:The preservation of the remains or an imprint of a
living organism in a geological structure.
- Pour out plaster of paris into the paper plates. (you might want to do
this ahead of time).
- Have students pressing items into the plaster of paris and lifting
them up right away to make impressions.
- Explain to students that normally, fossils are created when the object
decomposes.
- Let plaster dry.
- Paint if you would like. Try using different coloured paint for each
impression.
- Variation:Wrap a plaster of paris
ball around a small plastic object (eg: toy for birthday bags like
dinosaurs, spiders, etc.). Crack the ball carefully and you should see an
impression of the object in the plaster
|


has a rock collection, have your students brainstorm on what they know about rocks. Do this by seating your students in a large circle and placing the rocks that they have collected in the middle of the circle. Ask your students what they already know about rocks and organize their information on a large sheet of butcher paper by creating a word web of facts. Ask them the following questions and record:

